
Jul. 25, 2025
9 min read
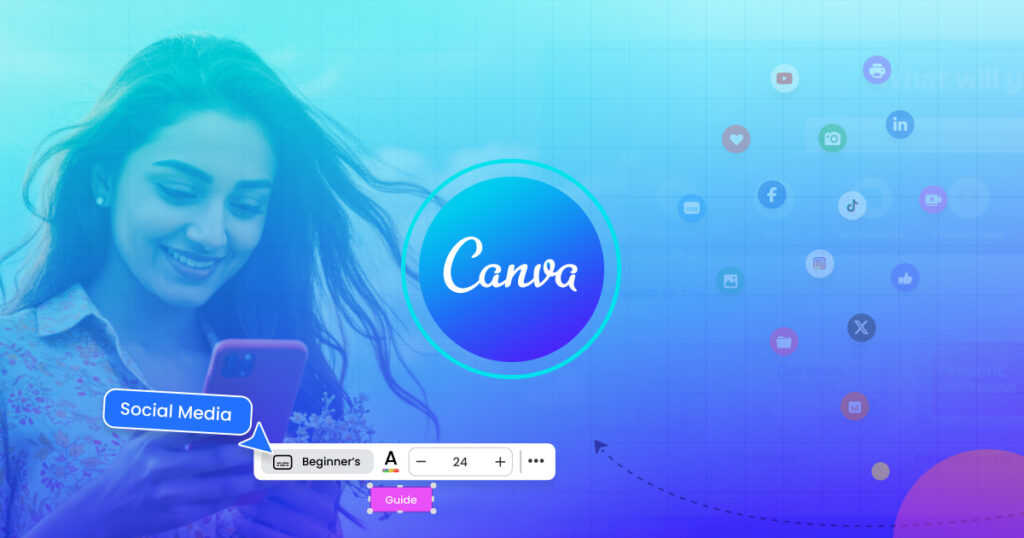
Canva is no longer just a design tool; it’s a content creation powerhouse, especially for beginners navigating the world of social media. With its intuitive drag-and-drop interface and an ever-growing library of customizable templates, learning how to use Canva for social media as a beginner has never been easier.
Whether you’re designing Instagram Reels, YouTube thumbnails, or branded quote graphics, Canva offers an efficient way to create, organize, and even schedule professional-looking content, no design skills required.
In this guide, we’ll explore the best ways to use Canva to create high-quality social media content consistently and confidently, without breaking a sweat.
Ready? Let’s go…
1. Customize Ready-Made Templates for Social Media Posts
One of the easiest ways to use Canva for social media as a beginner is by taking advantage of its extensive library of ready-made templates. Whether you’re designing an Instagram story, Facebook post, Twitter graphic, or even a flyer to promote an event, Canva has thousands of professionally designed templates to get you started.
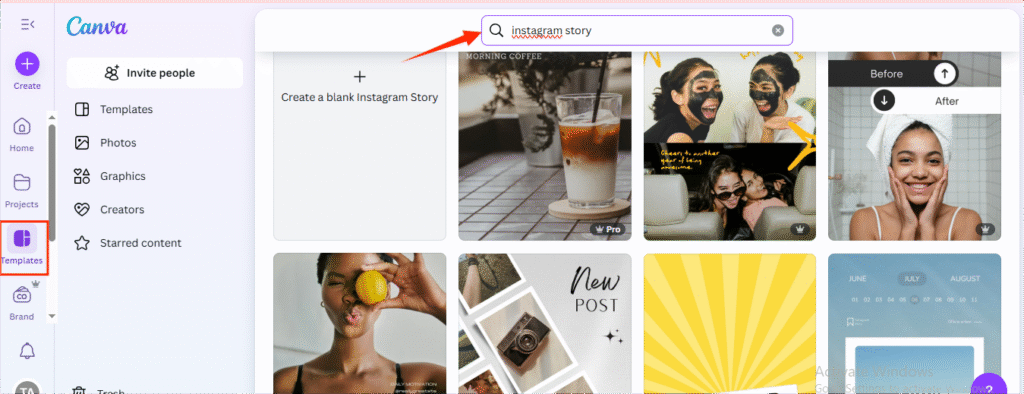
All you have to do is type what you’re looking for into the search bar (e.g., “Instagram post” or “LinkedIn banner”), and you’ll instantly see tons of options. Take your time to scroll through and find a style that fits your content. Be aware of templates marked with a little crown icon; these are part of Canva Pro, so you’ll need a subscription to use them.
What’s great is that every template is fully customizable. You can easily:
- Swap out the fonts and text
- Change up the colors to match your brand
- Add your logo or website
- Upload your photos or use one from Canva’s free image library
This is one of the simplest and most effective ways for beginners to create professional-looking content without needing design experience, and show up consistently and confidently across social platforms.
Templates eliminate guesswork and help you stay visually consistent, especially when you’re short on time.
2. Create Unique Images Instantly with Canva AI
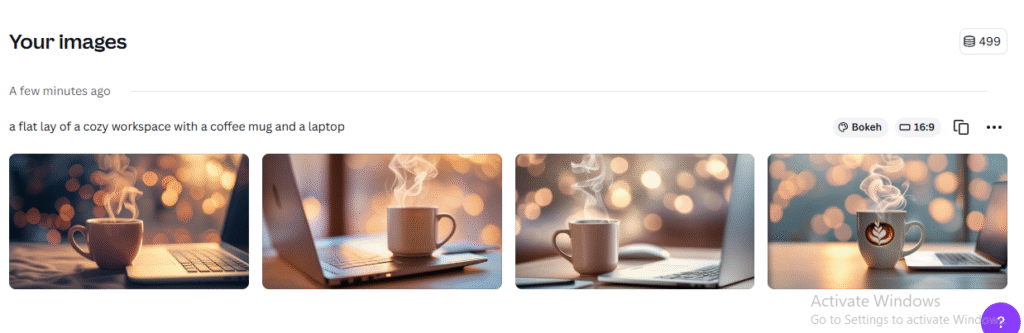
One of the biggest challenges people face when trying to post consistently on social media is simply not having enough original content. But with Canva’s built-in AI image generator, that problem just got a whole lot easier to solve.
This tool lets you create fresh, unique images using just a text prompt, no camera or photo shoot required. Just describe the kind of image you want as vividly as possible, for example, “a flat lay of a cozy workspace with a coffee mug and a laptop,” and Canva will generate it for you in seconds.

You can also:
- Choose the style you want (photo-realistic, 3D, drawing, etc.)
- Select the right aspect ratio to fit the platform you’re designing for
- Adjust the output by simply rephrasing your prompt
While some results may need tweaks, you’ll often get images that are creative, on-brand, and ready to post.
3. Create Short-Form Videos Fast with Magic Design
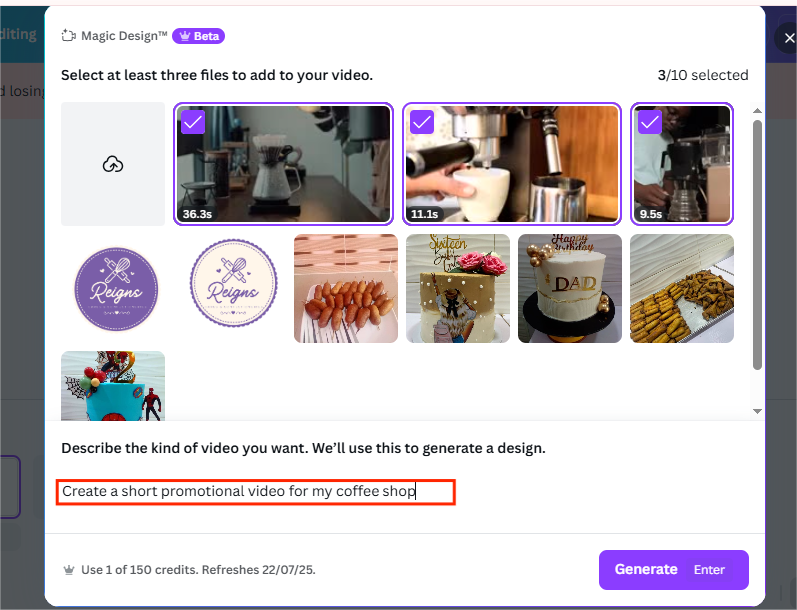
Short-form videos are the king of social media right now, and Canva makes it incredibly easy to create them, even if you have zero editing experience. With Canva’s Magic Design, you can turn raw clips into polished social media videos in minutes.
Here’s how it works:
Just upload your clips, describe what the video is about in a simple prompt, and Canva will generate a full video for you, complete with synced audio, transitions, and on-screen copy that matches your description.
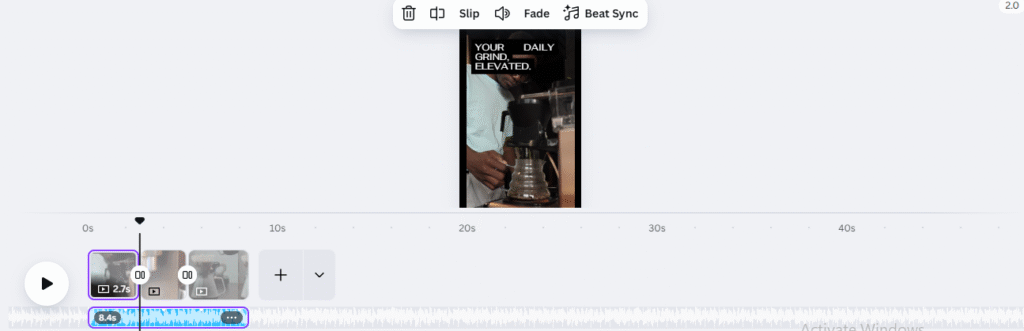
It’s fast, beginner-friendly, and takes the heavy lifting out of video editing.
You can then export your finished video and post it as an Instagram Reel, TikTok video, or YouTube Short, all without spending hours in a complicated editor.
Full access to Magic Studio (which powers this feature) requires a Canva Pro subscription, but for a tool that can save you hours every day, it’s a worthy investment if showing up consistently with video content is a priority for you.
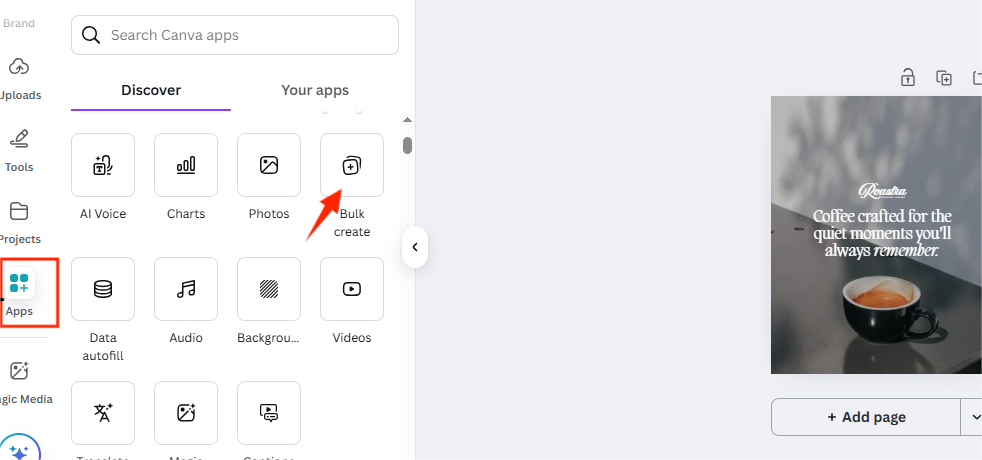
4. Create Content in Bulk to Stay Ahead
One of the smartest ways to use Canva for social media as a beginner is by batch-creating your content, and Canva makes this super efficient with its Bulk Create feature.
Batching lets you avoid daily content pressure and focus on quality instead of scrambling for ideas
So, instead of designing one post at a time, you can create days’ or even weeks’ worth of content in just a few minutes, all while keeping your branding consistent.
Here’s how to do it:
First, come up with multiple social media captions, quotes, or tips that fit your content pillars: educational, inspirational, promotional, or entertaining. You can use ChatGPT or Canva’s own Magic Write to quickly generate content ideas.
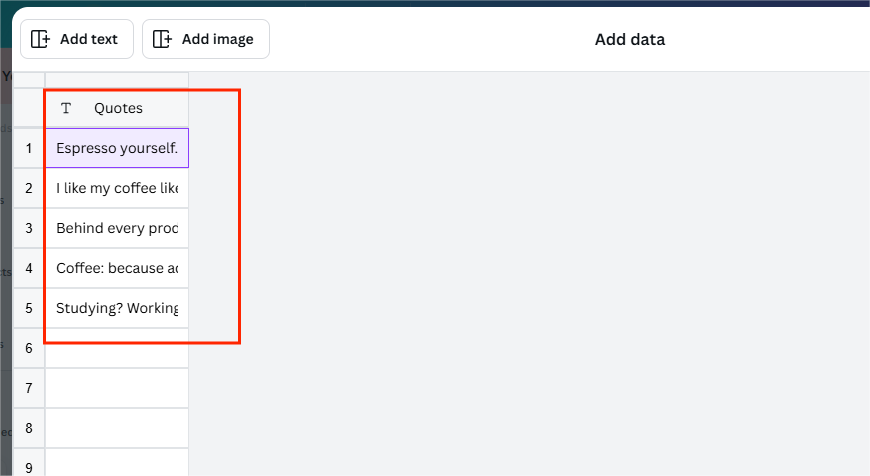
Next, paste your list of quotes or captions into a spreadsheet.
Then, hop over to Canva, choose a template you like, and add your branding elements (like your logo, colors, or social handle). From there:
- Go to the Apps section and select Bulk Create
- Upload or paste your list of quotes directly into Canva
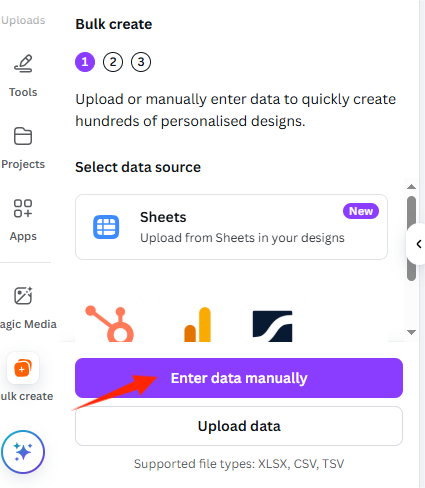
- Highlight the text in your design where the quotes should go
- Click Connect Data, then hit Continue
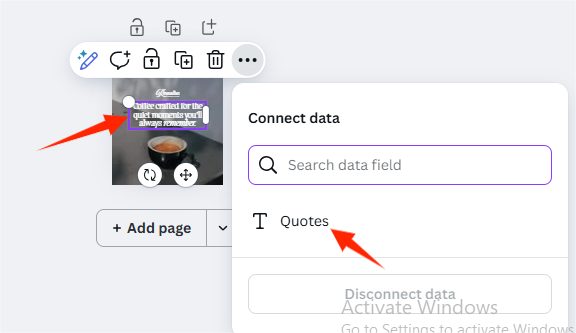
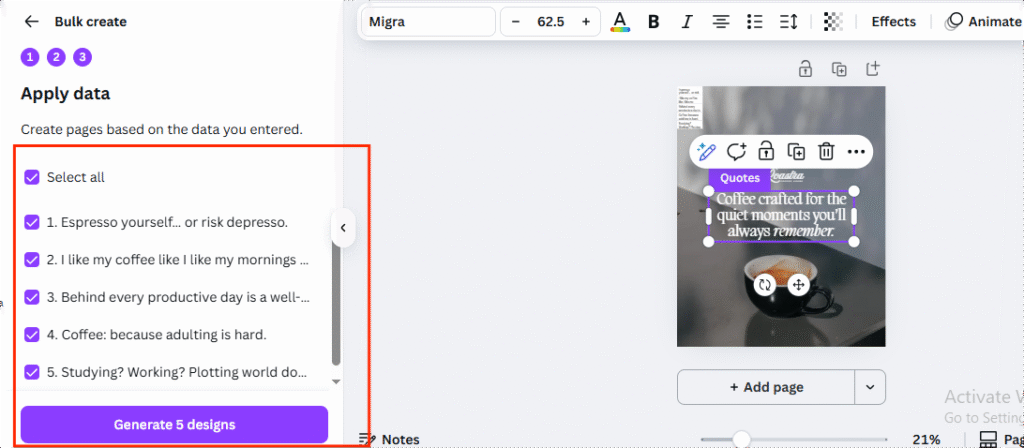
- Canva will generate individual designs using your quotes or text list

You can even change up colors or layouts slightly to make each one feel fresh while staying on brand. If you’ve set up a Brand Kit, this part becomes much faster.
Just like that, you’ll have a whole batch of social media posts, perfect for daily content, stories, or scheduled posts.
5. Set Up Your Brand Kit for Consistency
If you’re using Canva for your business or personal brand, then setting up your Brand Kit is a must.
The Brand Kit is where you can store all your visual brand assets in one place, from your brand colors and logos to your fonts (yes, even custom fonts you upload yourself). Once it’s set up, applying your branding to any Canva template becomes effortless.

Instead of trying to remember hex codes or constantly uploading your logo, your brand elements are just a click away. When you’re customizing templates, you can easily shuffle through your saved brand colors to find what works best, no guesswork involved.
This not only saves you tons of time, but it also ensures your social media feed stays consistent, polished, and professional, which is key when you’re learning how to use Canva for social media as a beginner.
Consistency builds trust, and Canva’s Brand Kit helps you maintain that visual identity across every post you create.
6. Plan Out Your Instagram Feed Aesthetic
Let’s be real, Instagram is all about aesthetics. If you want to attract attention and look polished and trustworthy on the platform, your feed needs to reflect that vibe. Fortunately, Canva makes it super easy to plan and design your Instagram feed, even as a complete beginner.
Let’s start with Instagram highlight covers: those little circles at the top of your profile. They’re one of the first things new visitors see and offer a quick snapshot of what your brand or page is about. To create yours, just search “Instagram highlight covers” in Canva, pick a template you like, and customize it with your colors, text, and icons to match your branding.
Now, to visualize your actual feed layout, Canva can help you preview how your posts will appear together. Here’s a simple way to do it:
- Open a blank Instagram post or reel template.
- Search for a perfect square frame in the “Elements” section.
- Duplicate it to create a 3×3 grid, just like an Instagram feed (3 rows of 3 squares).
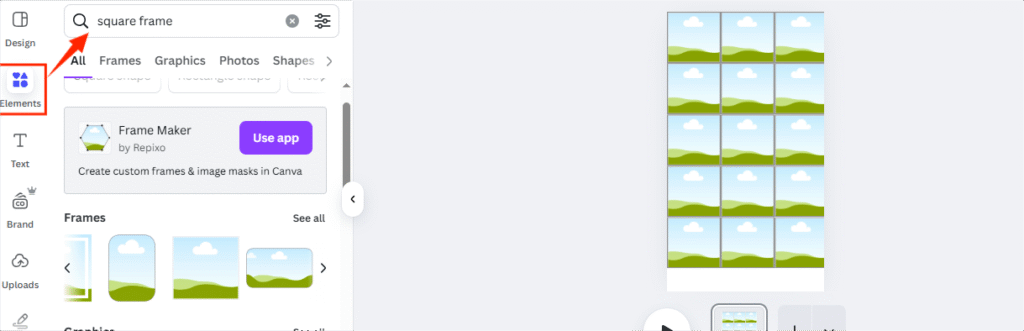
- Upload your graphics, quotes, and images, and drag them into each square.
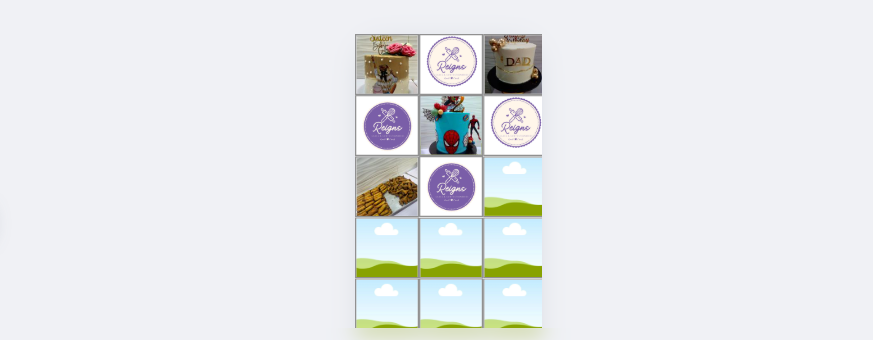
This allows you to play around with your content before you post it, rearrange the order, test different colors, and try different visual layouts until everything flows beautifully. Try popular layouts like the checkerboard or rainbow grid to bring cohesion to your feed. Canva makes it easy to preview before you post.
7. Schedule Your Content with Canva’s Content Planner
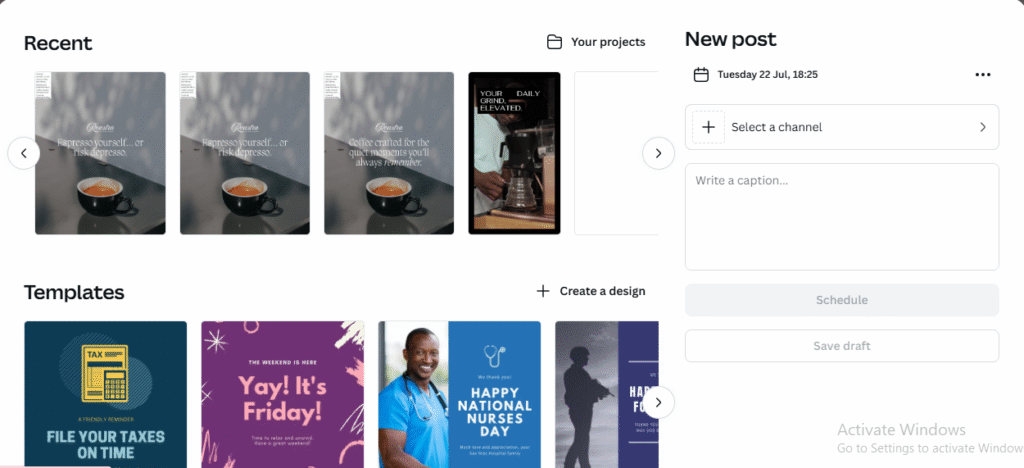
One of the best ways to stay consistent on social media is to plan and schedule your posts ahead of time, and Canva has a built-in content planner that makes this incredibly easy.
The Content Planner in Canva appears as a calendar, and it supports direct scheduling to Instagram, Facebook, X/Twitter, LinkedIn, Tumblr, and Pinterest, which is super handy for anyone trying to stay visible without manually posting every day.
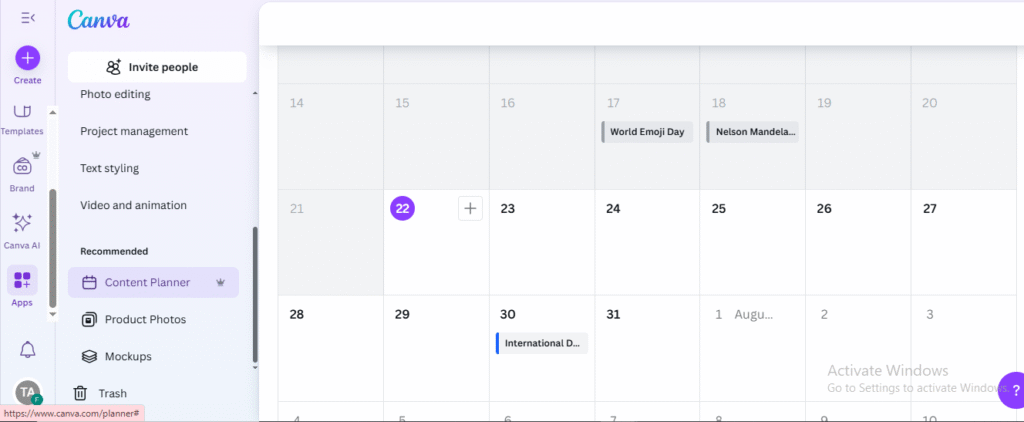
It’s very beginner-friendly. Just hover over any date in the planner, click the plus (+) icon, select the design you want to post, write your caption, and set the time you’d like it to go live, and you’re done!
What’s super cool is that the calendar highlights important holidays and observances throughout the year, so you can prep your content around trending dates or relevant events without scrambling at the last minute.
As a beginner learning how to use Canva for social media, this feature can save you a lot of time and help you maintain a consistent presence online, without the daily hassle.
Final Thoughts
Learning how to use Canva for social media as a beginner can feel a little overwhelming at first. There’s a lot to explore, and it might take a while before you feel like you’ve really “got it.” But here’s the thing: the only way to get better is to keep experimenting. Try new features, test out templates, make mistakes, and just create.
Your first design might not be perfect (and that’s okay!). The more you use Canva, the more confident you’ll become, and before long, creating content will start to feel like second nature.
Now, it’s worth mentioning that some of the features I highlighted in this post (like Magic Design, scheduling, and the brand kit) do require a Canva Pro subscription. But if you’re serious about showing up consistently and professionally online, it’s definitely a worthy investment, given how much time and stress it can save you.
If you enjoyed this guide, you would also find these articles helpful:
Which Is the Best Video Editing App for Beginners? MetaEdits vs CapCut
7 Must-Have AI Tools For Content Creation [2025]
Until next time,
Ciao!